My Blinkie

Popular Posts
-
Welcome aboard the Midnight Garden Blog Train! 🌙 Click HERE to download my contribution to this enchanting blog train. Be sure to visit al...
-
Okay, ladies... you know I had to do a kit just for the black cats! 🖤🐾 Purrfectly Spooky is all about those whiskers, paws, and that lit...
-
Bringing the boss energy with this one! Mad Hustle is all about getting things done with style You can download the template HERE
-
Here's a tag I made using the amazing art from Keith Garvey and the beautiful kit Citrus by PinkParadox Productions . This is a very...
-
Say hello to sunshine with this template. Here Comes the Sun, perfect for warm days, happy vibes! You can download the template HERE
-
Okay, so this one’s been sitting half-finished on my hard drive for like... 2 or 3 years now (oops). But I finally pulled it together and I’...
-
 Hi all! I made this set using the kit 2018 Kit from Tiny Turtle Designs and I wanted to show you all my results as well as leave you a coup...
 -
This one is for all my spooky girlies who love a little mystery and a lot of witchy glam. Sorceress Enigma is moody, magical, and packed wi...
-
 Hi all, made some wordart, templates, and masks for the Misfits Blog Challenge over at Creative Misfits. There are tons of free goodies for...
 -
 Hi all! Here's another cluster I made for CM last year. Thought some of you might like it. Using the gorgeous kit from Dreaming with B...


Saturday, June 29, 2013

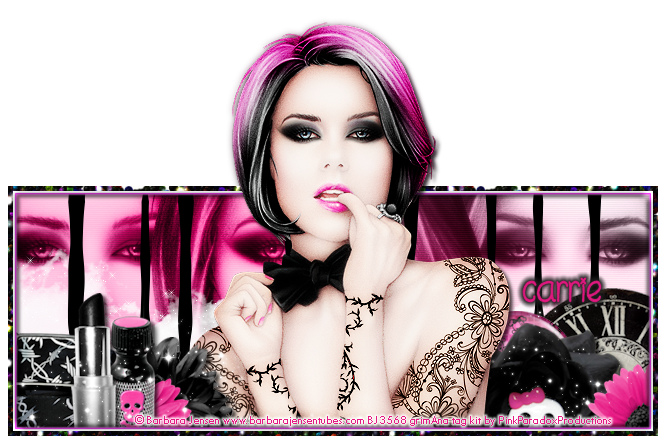
This tutorial was written on June 29,2013 by me . Any similarities to other tutorials is purely coincidental.Please do not claim as your own.This tutorial writter assumes you have a working knowledge of using Paint Shop Pro.This tutorial was done in Paint Shop ProX4, but can be use in other Paint Shop Pro versions. Please link to this blog if used for Forum Tutorials
Materials needed:
Tube: Teena Teese by Barb Jensen which you can purchase here
Kit: Girly Goth by PinkParadox Productions
Font: I love what you do
star brushes of choice
Filters:
Xero Radiance
Effects,Blinds
Eye Candy 4000, Gradient Glow
Eye Candy5, Gradient Glow
Lets Begin!
Open up a new image 650x250. flood fill with gradient of choice. I choose two colors form the tube. now go to Effect-Texture Effects-and choose the blinds of your choice.Now copy and paste tube CU,duplicate 2 times so you 3 CU of your tube, arrange to your liking. Merge the CU together and change the color to gray. Duplicate and on the top layer go to Adjust Blur and Gaussian Blur of 3. Blend mode to Soft light. On the bottom one sharpen and add Xero Radiance of choice. Blend mode to Luminance (Legacy) and change the opacity to 70%. Copy and paste main tube to the middle. Now for the elements. See my tag for placement you can add a drop shadow of choice as you go.
element 187
element 167
element 79
element 76
element 113
element 116 duplicate
element 55
elemet 13
element 51
element 48
Now make sure your main tube is on top of all the elements,then duplicate. On the top layer gaussian blur of 3 and blend to soft light. On the bottom one sharpen and add Xero Radiance again, add a drop shadow. On a new layer on top of your tube select all and flood fill with black add noise, modify-contract to 5, Invert and delete & deselect. then go to Eye candy 5 and select gradient glow the settings for mine are as following

Now go to Adjust canvas size to 650x450 again make sure your tube is on top and carefully erase anyparts that are sticking out from the bottom. add your copyright info and your name. Now for the name I left it plain but with a gradient glow of medium and the color black.
Avatar:
For the Avatar open a new image 120x200. Fill with the same gradient and add the same blinds effect you did on your banner. Copy and paste your tube duplicate and add same effects you did to you banner. add any elements you wish. When your done add a new layer and flood fill with black. add noise and select all modify-contract to 5, Invert and delete & deselect add the same gradient glow effect you did to the banner and add the copyrights.
That's it your done! thank you for trying my tutorial hope you liked it.
Subscribe to:
Post Comments
(Atom)
About Me

- Ana Grimaldo
- Hi I'm Ana or grimAna. I'm a mother of 3. I love tagging, reading, drawing and I love anything to do with homemade things or DIY!
0 comments:
Post a Comment